
miniserver:bluetooth_sound
목차
우분투 14.04.2 LTS 서버에서 블루투스 스피커 연결
사운드 설정
우선 기본적으로 스피커로 소리가 나야 되지 않을까 생각하였다. pulseaudio 패키지를 설치하였다.
$ sudo apt-get install pulseaudio bluez-alsa bluez bluez-tools python-gobject python-dbus alsa-base
사운드가 영 설정이 꼬여 있으면 다음처럼 실행해 완전 초기화
$ sudo apt-get remove --purge alsa-base pulseaudio
$ sudo apt-get install alsa-base alsa-utils pulseaudio
$ sudo alsa force-reload
pulseaudio, bluetooth 자동 시작하도록 변경.
$ sudo update-rc.d pulseaudio defaults
$ sudo update-rc.d bluetooth defaults
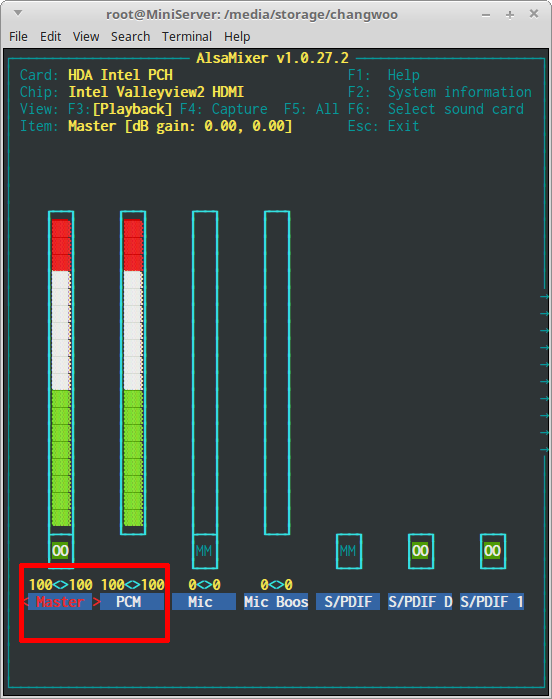
alsamixer 에서 MUTED 해제. 'MM'이라고 써져 있음 안됨.
샘플 WAV 파일을 가져 와서 한 번 재생이 되는지 살펴 보자. mplayer 가 없다면 aplay 명령을 써도 된다. 그치만 나중에 mplayer를 쓸 거니 미리 설치해도 된다.
$ cp /usr/share/sounds/alsa/Front_Left.wav ~
$ mplayer ~/Front_Left.wav
블루투스 설정
미니서버는 다행히 한성 노트북처럼 블루투스 모듈 드라이버로 트러블을 일으키지는 않았다. 다행히 모듈은 잘 잡히고 페어링까지 문제 없이 실행된다.
# hcitool dev         # 블루투스 장치 검색
Devices:
	hci0	30:3A:64:4F:B9:3C
스피커 부분을 페어링 모드로 변경하고
$ hcitool scan
Scanning ...
	40:EF:4C:15:DF:B2	IA160
	28:E3:47:83:C2:0A	laptop
40:EF:4C:15:DF:B2 주소의 'IA160'이 내가 연결하고 싶은 블루투스 스피커이다.
# bt-device -c 40:EF:4C:15:DF:B2  # 페어링
Connecting to: 40:EF:4C:15:DF:B2
Agent registered
Agent released
Done
# bt-device -l   # 페어링된 목록 확인
Added devices:
IA160 (40:EF:4C:15:DF:B2)

# bt-device --set IA160 Trusted 1  # 스피커는 신뢰할 수 있는 연결이므로 인증시킴
Trusted: 0 -> 1

# bt-device -i IA160  # 디바이스 정보
[40:EF:4C:15:DF:B2]
  Name: IA160
  Alias: IA160 [rw]
  Address: 40:EF:4C:15:DF:B2
  Icon: audio-card
  Class: 0x240404
  Paired: 1
  Trusted: 1 [rw]
  Blocked: 0 [rw]
  Connected: 1
  UUIDs: [AudioSink, AVRemoteControl]
그 담 매우 중요한 설정으로 /etc/bluetooth/audio.conf 파일의 [General] 부분에서
Enable=Source,Sink,Headset,Gateway,Control,Socket,Media
위 부분이 없다면 꼭 넣어주어야 한다. 그렇지 않으면 “org.bluez.Error.Failed: Connect Failed” 메시지를 띄우며 연결이 되지 않는다.
블루투스 스피커 연결과 해제
# bt-audio -c IA160             # 혹은
Connecting to an audio service
Audio service is connected

# bt-audio -c 40:EF:4C:15:DF:B2 # MAC 주소로 가능
Connecting to an audio service
Audio service is connected

# bt-audio -d IA160             # 연결 해제. 물론 MAC 주소로도 가능
asound.conf 작성
#/etc/asound.conf

pcm.bluetooth {
   type plug
   slave {
       pcm {
           type bluetooth
           device 40:EF:4C:15:DF:B2
           profile "auto"
       }
   }
   hint {
       show on
       description "IA160"
   }
}
ctl.bluetooth {
  type bluetooth
}
$ aplay -L
결과에서
bluetooth
    IA160
이 부분을 발견해야 한다.
그러면 aplay와 mplayer로 재생 테스트
$mplayer -ao alsa:device=bluetooth /usr/share/sounds/alsa/Front_Center.wav
$aplay -D bluetooth /usr/share/sounds/alsa/Front_Center.wav
mplayer 에서 블루투스로 소리 재생
# mplayer -ao alsa:device=bluetooth [file]
참조 자료
- https://bbs.archlinux.org/viewtopic.php?id=141760 결정적으로 소리 나오게 한 단서
/etc/bluetooth/audio.conf - https://bbs.archlinux.org/viewtopic.php?id=166678&p=2 D-BUS permission 에 대해 뭔가 팁을 주는데 여기와는 맞지 않는 것 같다.
- http://linuxcommando.blogspot.kr/2013/11/how-to-connect-to-bluetooth.html 블루투스 CLI 명령은 대부분 여기서 참고했다.
- https://help.ubuntu.com/community/BluetoothSetup 예전 우분투 도움 문서. python-gobject python-dbus 패키지가 도움이 되었나?
- http://www.correderajorge.es/bluetooth-on-raspberry-audio-streaming/ 앞으로 오디오 스트리밍에 필요한 많은 것들을 알려 줄 것만 같은 곳
일반사용자 권한 주기
일반 사용자가 특정 명령만을 쓸 수 있어야 하니까
/etc/sudoers.d/changwoo_bluetooth
changwoo ALL=(ALL) NOPASSWD: /usr/bin/bt-device -l, /usr/bin/bt-device -i *, /usr/bin/bt-audio -c *, /usr/bin/bt-audio -d *
이제 alias도 추가해 준다.
~/.bash_aliases
alias bt_mplayer='mplayer -ao alsa:device=bluetooth'        # 블루투스로 mplayer 재생
alias ia160_info='sudo bt-device -i IA160'                  # ia160 정보
alias bt_list='sudo bt-device -l'                           # 블루투스 오디오 연결 정보
alias ia160_connect='sudo bt-audio -c IA160'                # IA160에 연결
alias ia160_disconnect='sudo bt-audio -d IA160'             # IA160에 연결 해제
alias ia160_check_connection="ia160_info | sed -rn 's/ *Connected: ([[:digit:]])/\1/p'"
miniserver/bluetooth_sound.txt · 마지막으로 수정됨: 저자 changwoo